Cutting your fabric
Print a copy of the Kayla's Cloth Kits cloth mama pad pattern. Cut the 2 pieces out directly on the line (no seam allowance is necessary).

Place the soaker pattern on your soaker fabric. Using the KCK mama pad pattern as a guide, cut the number of pieces that you desire for your soaker. Shown below: two layers of microfiber as a soaker.

Use the KCK mama pad main body pattern as a guide to cut one piece from your outer layer fabric and one piece from your inner layer fabric. Make sure to mark where the hook and loop will be placed on the wings of the inner and outer layers of fabric. Shown below: white cotton fleece-this is the outer layer of the cloth mama pad that will face the underwear and flowered flannel-this is the inner layer of the cloth mama pad that will face the skin.

Pin all of the cloth soaker layers together. Sew around the perimeter of the rectangle with a straight stitch and a ¼ inch seam allowance. Make sure to reinforce your start and stop points.


Attaching and Sewing the Aplix
Pin a 1" x 1" piece of hook (rough) tape to the good side of your outer fabric approximately ½ of an inch from the cut edge using the KCK cloth mama pad pattern marks for reference.
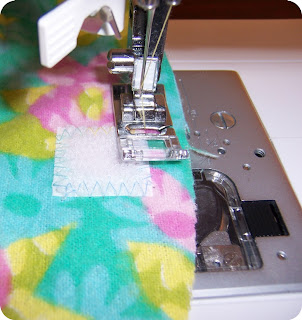
Pin a 1" x 1" piece of loop (soft) tape to the good side of your outer fabric approximately ½ of an inch from the cut edge using the KCK cloth mama pad pattern marks for reference. Shown below: attaching and sewing the loop tape to the inner fabric.

Place the two main body pieces of the KCK cloth mama pad together
(wrong sides together, good sides facing out) and check to make sure
that the hook and loop closures line up well with each other when you
fold the pad.

Use a zig zag stitch to attach the hook (rough) tape to the good side of your outer fabric approximately ½ of an inch from the cut edge. Reinforce your start and stop points.
Use a zig zag stitch to attach the loop (soft) tape to the good side of your inner fabric approximately ½ of an inch from the cut edge. Reinforce your start and stop points.

Trim the four sharp corners of the aplix to prevent them from stabbing you and making you unfortable!

Attaching the Soaker
With the WRONG side of your INNER fabric facing up, center the soaker on your inner fabric. Pin the soaker to the WRONG side of your inner fabric. Sew the soaker to the inner fabric (sew straight as this stitching will show on the finished pad) using a straight stitch and a ¼ inch seam allowance. Be sure to reinforce your start and stop points.

Sewing the Body Together
Bring the inner and outer main body pieces together (WRONG sides facing each other, good sides out).

Sew around the perimeter of the pad with a zig zag stitch or an overlock stitch if you have one. Sew close to the edge of the fabrics without a seam allowance. Be sure that both layers get sewn to avoid holes! Reinforce your start and stop points.
Quilting the Soaker
Finally, sew quilting stitches into the soaker to keep the soaker layers together and to attach the soaker to both the inner and outer fabrics. You may use any design that you like as you sew with a straight stitch through the soaker layer. Be creative!


